
Wednesday, November 7, 2012
September SOTM
For the last year I have been trying to find a group to learn new techniques, now I know there are plenty of YouTube videos out there but really I don't want to spend all my time watching videos when I can be playing with my scrappy stuff. I did join a Stamp'in Up group but was not a fan of their product, had to purchase $25 worth of their stuff which was hard when I don't like something. Then of course I became a Close To My Heart Consultant because I LOVE their product and was getting discouraged that every time I applied to a Design Team I was told no. Well my desire to finally learn new techniques is happening. Also most on a monthly bases I learn something I never knew or try something I hadn't done before. This month was CTMH's new alcohol based markers and blending techniques.
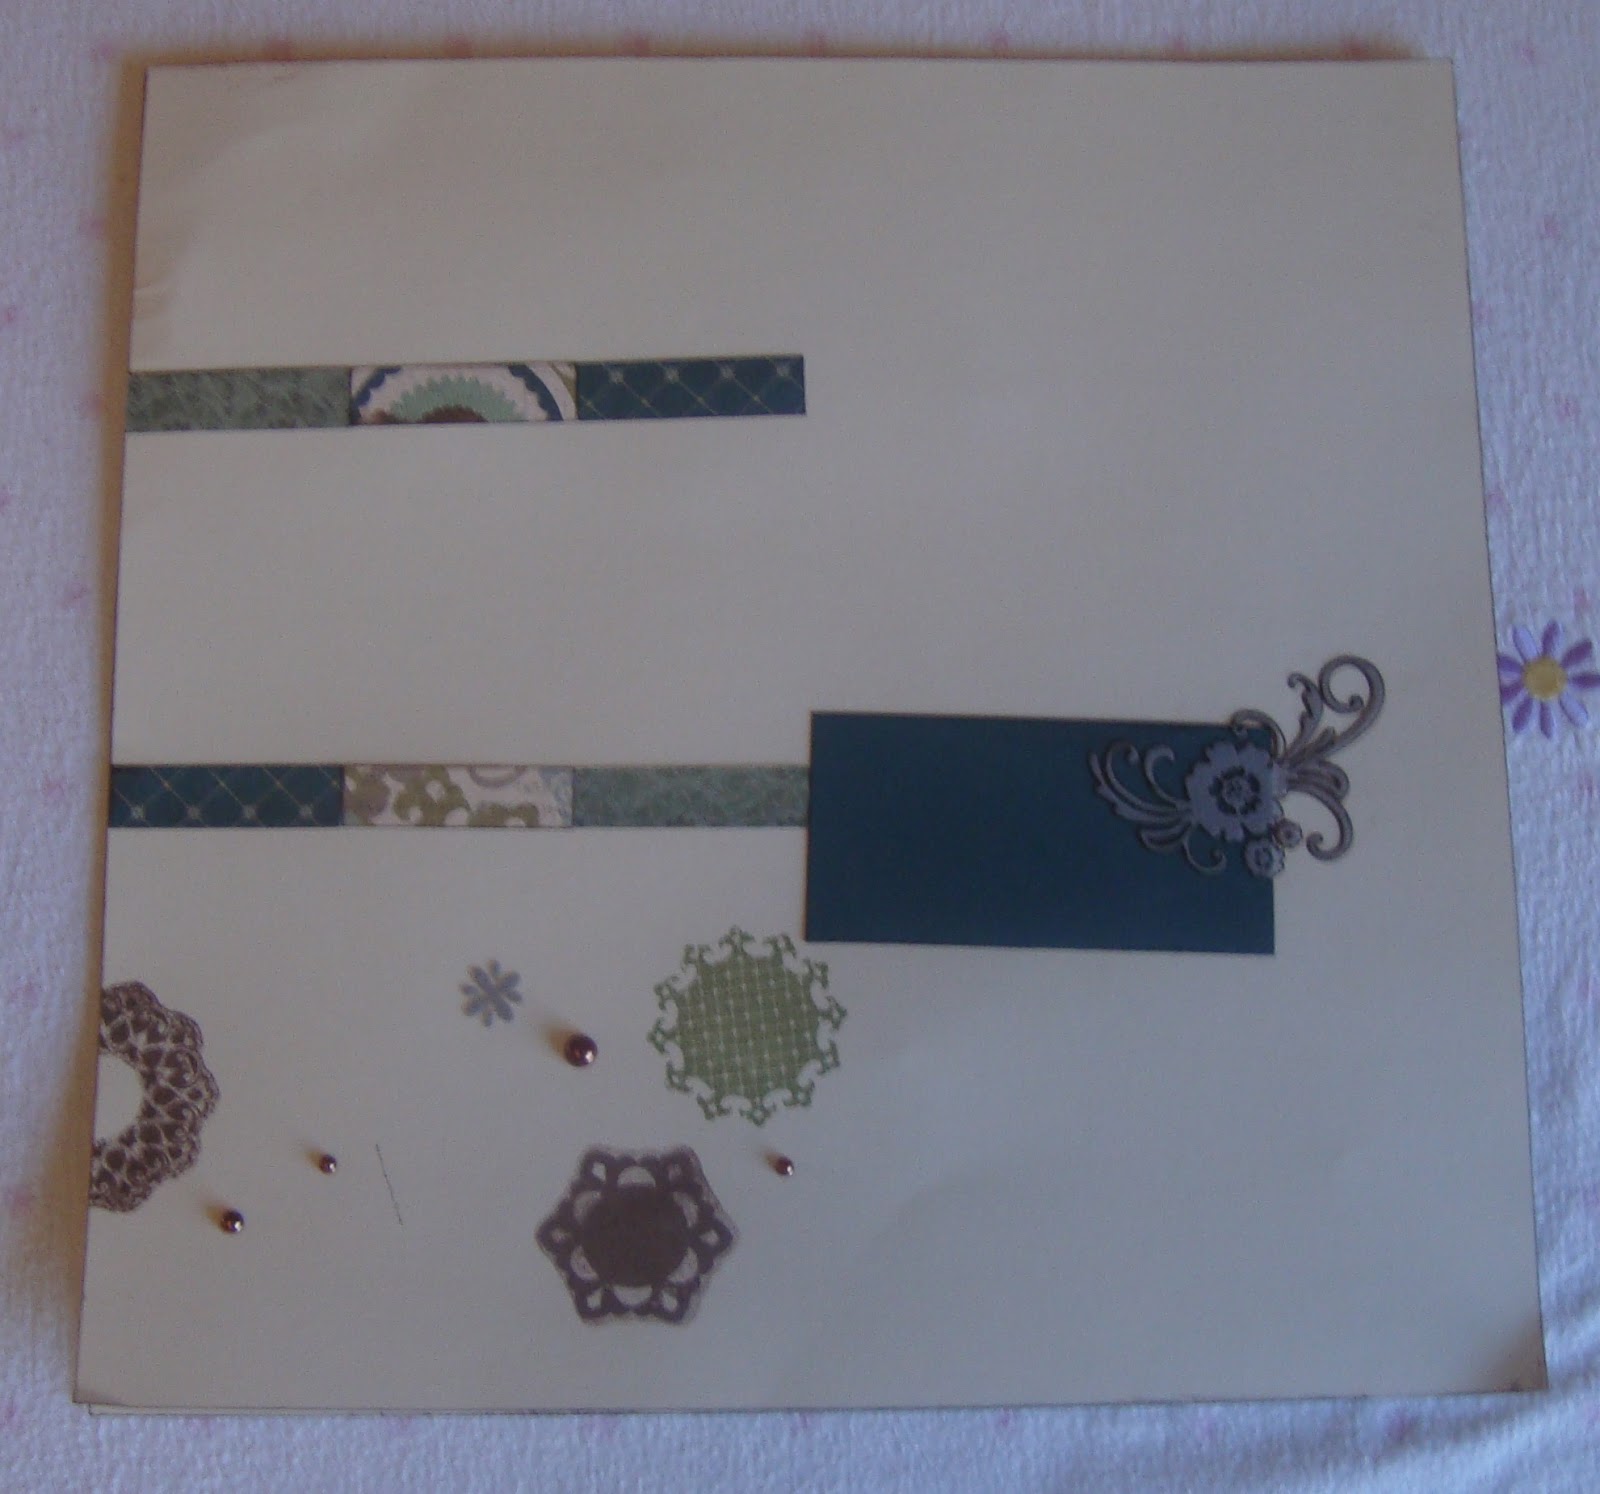
 Here is the LO for Sept. The word patch was cut out on my cricut once in cream and second in brown, same size both times and then just slightly miss aligned so you can see its shadow. I then pop dot them up for more affect. Also got to use burlap ribbon for the first time too, boy is that stuff is messy but what a neat texture it adds . I also used my SewEasy to punch the straight holes around the page and twine to stitch it. The small tag is also cut using the cricut and is just waiting for a date to be posted on it once the pictures are added. The pumpkins are stamped and then coloured using CTMH markers and blended, I then fussy cut them out and pop dotted them up too. Now I did not get a picture of my girls at the pumpkin patch this year so this will have to wait until next years photos.
Monday, November 5, 2012
Altered gifts
Good morning all my crafty friends!! There are several websites I talk about regularly on here and one of the ones I am most active on is www.scrapbook.com I am very active on that site as a daily poster. My full gallery is on there of work I have done in the last 7 years. Most of the swaps I do now are pal swaps or altered swaps. This one group I am in is a 3 month commitment and for those 3 months you send you secret pal a $25 scrappy gift plus any extras you would like to send. This last sister that I had I spoiled, she was a fellow Canadian and I also made her an amazing set for her desk.
 This is the Journal that I made. All CS is DCWV the Sweet Treats stack. The fabric on the binding is from Walmart. Everything is done in pink and brown which is a beautiful combination of colours. I used a beaded and lace trim from my stash with a matching beaded trim to run down the journal between the paper and fabric. The little bronze plaque says "Friends" I punched a hole in both the front and back cover for the ribbon closer. Flower spray, pink ribbon bow and heart trinket all from my stash. Added a jeweled stickpin to the ribbon flower.
So elegant and feminine.
 Here is the matching stationary box. This is an altered cigar box and the CS is DCWV Luxury stack. Again I lined the box with fabric and CS, the lace has a pink trim and the braid is also pink both of which I received from Lorna Lee on sb.com. The butterfly, flower, and fabric and lace flowers are from my stash and some that I bought from www.laceheaven.com Again added a stickpin which is the matching one to the Journal.
 I made about a dozen matching cards to go in the box. I did not have enough fabric to line the bottom because I cut the fabric wrong :( but normally that would also be lined.
I LOVED making this set and I am surprised at how quickly I can make this all at once. I love it when an idea comes to such sweet fruition and the finished project looks better then the one in your mind.
I have a new little sister to make something for and the last month is December, I am thinking an ornament but not sure what else yet. Have a wonderful day and God Bless :D

So elegant and feminine.


I LOVED making this set and I am surprised at how quickly I can make this all at once. I love it when an idea comes to such sweet fruition and the finished project looks better then the one in your mind.
I have a new little sister to make something for and the last month is December, I am thinking an ornament but not sure what else yet. Have a wonderful day and God Bless :D
Friday, November 2, 2012
Lost Post
Seems that I lost my Halloween Post. Not completely surprised as I had an insane week trying to get everything done. Of course things have not slowed down completely yet. Well I was getting all my post done and scheduled too, I was also making cards and packaging them to sell at my first trade show. First I had to make 100 cards as bag stuffers for the first 100 people through the door, then I had to make some to sell(which I did not sell any of LOL). Next I had to make a Christmas Advent Calendar as a display, now originally I had a partner for the show but she got a new full time job and ended up sick so was not able to attend with me. It was her job to make the Advent Calendar, she dropped it off at my house the night before the show, UGH. Got it all done in the morning and then proceeded to pack up for the show. Also had to make a draw basket so people could enter to win the Advent Calendar. Once all packed up and everything was in the van I then needed to get ready :D
Well I get there, and start setting up when the lady running the show comes over and tells me I won a prize for best bag stuffer!? I didn't even know there was one LOL. Apparently it was decide that I won because I handmade a hundred cards. I explained to the woman that that is what my business is and I thought the idea was to showcase my business for the stuffers. She said it was amazing and I get first dibs on a table at the next trade show as well as a discount price. I thought that was pretty cool but at the time was not sure if I would do another one. It really depended on the response I got that night. Well let me tell you it was amazing. over 400 women were at the show and I got a ton of new contacts, which I need to start calling now that Halloween is done. The next show is in May in time for Mother's day so I am thinking of making a 100 little purses or a flower box. I have to check out my Cricut Cartridge and choose something amazing that will get people calling me. Plus need to make a bunch of altered journals to sell, was told by several ladies that they would by them if I had them. They saw mine there as I use it to take notes and things when it comes to my business of Close to My Heart.
Well I think I have bored you enough and it is time to start up with my more crafty posts again. Check out my next one as it will that gorgeous set I made for a pal. :D
Have a crafty day and God Bless.
Wednesday, October 31, 2012
Moonlight WOTG
I know that I said I would have an incredible project to show you that I made for a pal but it is Halloween and choose to share with you this great Halloween LOs and Bonus project. I can't wait to take pictures of my little girls and put them on these pages.
 I always start first by reading the directions then cutting out the CS. Then I sort it all out and get ready to stamp. This LO required not only stamping but fussy cutting too. I really don't like to fussy cut but have to admit if I had some of the elements on the page would not pop the way they do. Unfortantly that does not transfer well in a photo. I cut a piece of orange CS like a ribbon then stamped it with the web boader, I also used the same stamp on some of the purple CS. I then added the little stamped spider hanging of the web. The mummy and letters for boo are stamped then cut out. You cant tell here but the mummy is coloured using CTMH alcohol markers in Smoky Plum. Itty bitty rhinestones are added to the spiders eye as well as the skull brads to adde some sparkle. Used black rhinestones on the letters.
 Now this one was fun to stamp. I had to line up the letters for Halloween and because I only have on "l"and one "e" I had to restamp those letters in the right postion. The lamp post is also a stamp, for the lamp and sign portion I stamped those seperatly and coloured them then cut them out and applied them to the lamp post. Looks great, neat technique but a pain and depending on what you are doing time consuming. Same treatment to the skull brads as the first LO. Oh and I almost forgot, I destressed the black CS to add more depth, love the fact it is white core so very noticeable.
 Here they are just waiting for this years costume pictures. I am really enjoying working with CTMH stamps and paper.


Monday, October 29, 2012
Butterfly Kisses
As most know from following my blog I LOVE DCWV!! Even now when I should be buying CTMH CS I still am purchasing from my favourite pp company :D . Earlier I had posted about a swap I was in that is 12x12 LO and I did a winter one, well I was also to do one for spring.
 All CS used of course is DCWV from their Spring Fling Stack both printed and solids. The title is done using their new Shimmer stack and cut on the Cricut Princess Cartridge. I ran the letters through my xryon 1.5 sticker maker so they would be easy to apply.The yellow strip is also from the Shimmer stack, you know me has to have some glitter/sparkle some how :D . The little pink flower is a foam one from my stash, the jeweled butterfly strip is from Reflections continuous strip cut for the length I wanted. I took a short length of tulle in pink and tied a knot in it, then using my pliers I put a swirl in the bottom of a stick pin that I had tied in said knot.
 The requirements for the LOs was 2 photo mats at 4x6, Journal spot and embellished 3 times. With the second pg of the LO I added a beautiful stamped image of a butterfly by CTMH. Cut out a folder with my Cricut using the Artiste Cart that again is exclusive to CTMH. Found some need hot pink netting in my stash and added that as well as the dangle bead drop which I believe I picked up from Michael's.
 When I think Spring it brings to mind images of flowers, bees and butterflies. I think the bright colours and combination of pps make this a nice reminder of Spring.
Wait until you see the next blog post and the beautiful set I made for a pal.
Keep Crafting and Dream my friends, anything is possible as long as we believe! God Bless you all.


Wait until you see the next blog post and the beautiful set I made for a pal.
Keep Crafting and Dream my friends, anything is possible as long as we believe! God Bless you all.
Saturday, October 27, 2012
Artiste Collection
Close To My Heart has join up with Cricut to offer 2 exclusive Cartridges that offers 700 different images which include themed projects, cards, fonts, shapes and 3D images. Scattered throughout the Idea Book are many My Acrylix stamp images that are out lined in red. What this means is the stamp corresponds with a shape either on the Art Philosophy or the new Artiste cartridge. Not only does the stamp correspond with the Cartridge but it says what size it needs to be cut out at to make the image fit perfectly!
Now when I knew I was going to sign up with CTMH I figure I would need to upgrade my personal Cricut but $400 for a new Expressions 2 was a little over the top as I barly used my personal one. Then one day someone on Facebook was selling a New In Box E2 for $170. I was all over it and turned around and sold my personal one for $80. I am so happy that I did and I will post later a review of the E2. I have used the E2 with every project for CTMH that I have done, so since August I have used it more then I did the entire time, 6 years, I had my personal one LOL.

Now if you order the Artiste Collection not only do you receive the Cartridge but you also get 3 My Acrylix D-size Stamp Sets and 3 12x9 Dimensional Elements in coordinating shapes.
So a value of nearly $125 for only $99. not including shipping and tax.
So this time not only did CTMH design stamps for this cartridge and the Art Philosophy one but they also design 2 workshops that require the Cartridge.
 Here is the one I purchase and wanted to make. Every piece of paper is cut using the Artiste Collection. They recommend 6 hours to complete this project and most of that time is cutting. The stamp set that is exclusive to this workshop is a very cute Halloween set of course. I enjoyed putting this all together and seeing the diversity of images on the cart. It was defiantly worth purchase the cart for and have a TON of ideas now for making my girls Birthday parties more interesting and I can't wait for them to start school because I will be able to make wonderful items for their classmates for different holiday party's.
Even if you are not into stamping these 2 Carts are well worth the price to purchase. There is so much on them and ways to use the different projects too. Contact me if interested and I ship to the States too :D
Have a wonderful day Crafting, God Bless.
Now when I knew I was going to sign up with CTMH I figure I would need to upgrade my personal Cricut but $400 for a new Expressions 2 was a little over the top as I barly used my personal one. Then one day someone on Facebook was selling a New In Box E2 for $170. I was all over it and turned around and sold my personal one for $80. I am so happy that I did and I will post later a review of the E2. I have used the E2 with every project for CTMH that I have done, so since August I have used it more then I did the entire time, 6 years, I had my personal one LOL.

Now if you order the Artiste Collection not only do you receive the Cartridge but you also get 3 My Acrylix D-size Stamp Sets and 3 12x9 Dimensional Elements in coordinating shapes.
So a value of nearly $125 for only $99. not including shipping and tax.
So this time not only did CTMH design stamps for this cartridge and the Art Philosophy one but they also design 2 workshops that require the Cartridge.

Even if you are not into stamping these 2 Carts are well worth the price to purchase. There is so much on them and ways to use the different projects too. Contact me if interested and I ship to the States too :D
Have a wonderful day Crafting, God Bless.
Thursday, October 25, 2012
Tool Review
One of the most important purchases a paper crafter can make is their cutter/trimmer. I have tried 3 different ones and up until recently used my trimmer by Cricut. It has a pull out ruler so you can measure 12x12 pp on it. Makes great cuts but over time, I have used it for 5 years, the cuts are not always straight anymore. The problem I have found is the blade scores in a plastic grove and over time this grove gets cut up and is no longer straight so the blade doesn't run straight anymore. So the hunt was on for a new trimmer/cutter. Now in that 5 year span I have also purchase as 12x12 trimmer by Fiskers as well as several smaller trimmer for pictures again one is Fiskers and one is Wescott. All of them are OK but not what I was looking for. Then one day as I am searching and researching cutters I receive an email from www.scrapsteals.com and it is for the Cartridge Cutter by American Crafts.
 OOOHHHH this was just what I was looking for but of course the big issue was shipping. How much was it going to cost me to order this at 50% off and the shipping fees. Well the first time this deal was sent out I passed it by. I started to look around at the stores here to do a price comparison. Well, let me tell you it was cheaper to order it online. So now to wait until they offered it again which they did at the end of Sept. so order it I did. Then the wait began for it to arrive, 14 days later it was here and it was the first package I have had customs open to inspect. I have been receiving packages from the states for the last 5 years and this was the first one. No biggie really as I understand the need for them to check to make sure it is not something sinister LOL.
It is quite large, the surface is 8x14 maybe a little larger then that and the pull out ruler to measure larger pp goes up to 15". Very steady so will not more on you, I have used it on a verity of surfaces and no movement at all. The cutting guide flips to the side and again holds that pp well. It comes with 3 blades, a straight cutting blade, scoring blade and a decorative wavy blade with room to store 3 more blades on the cutter. The nicest part is that the blades are in a cartridge so are safe to handle. They are easy to pop in and out. The blades pop in to the cutter under the area that you push on and glade to cut the pp. The cuts are nice and straight and no pp tears as of yet :D . Now the one disadvantage I have found is that it is not a sit at your desk and cut your pp cutter. If you do not keep a continuous downward pressure on the cutter handle it will not cut your pp all the way through. Also when you use the extended ruler you are missing cut marks/points so you guess a little. Meaning on the main board it ends at 6 and when you open the ruler it starts again at 8 so you are missing all those marks in between. Not a huge deal as those are unusual sizes to make cuts at.
Over all I would recommend this cutter and that it is worth the price. I have not pulled out my Cricut trimmer since this one has arrived which tells me I have found the perfect one for me. I hope this helps out some of you as you look at the different cutters out there and would like a non partial opinion.
Happy Crafting and God Bless.
Tuesday, October 23, 2012
Avonlea Card Workshop
There are 2 Card workshops in this Fall/Winter catolog. Each one makes 15 cards, 5 each of 3 designs. As I already had a lot of the inks and markers I might need for the Avonlea Card Workshop that is the one I started with.
 Again here is their photo of the finished product, now on to my not so perfect cards LOL.
 The brown CS is stamped over and over to make a patterned sheet. I like the little bit of purple that is used to frame up the sediment. It was stamped using Slate and Smokey Plum. Some sheer grey ribbon with rhinestones on the ends to had some interest.
 You can just see the grey CS that is stamped, this time randomly to make a patterned strip. Smokey Plum ink for the sediment and the stamped flowers. Again the grey sheer ribbon and random rhinestones to add glitter.
 Now on to the card that taught me something new :D . I love CTMH acrylic stamps because it is easy to line up the stamps when doing a multi layered one or making your own patterned paper. The one thing I learn here was you can bend them too. That stamped boarder is a long straight piece that I curved and made into a swag idea. So cool and would never of thought of that on my own. Have many of these that I can do this to so will be playing with that on other projects.
 Now the kit is intended to only make the 15 cards but I had a lot of this paper collection left for the 3 different workshops I used it in. With the remains I made several of this card too. I inked the card in Slate then added all the different pps to it. I am glad I was able to get these all made as I am using all 4 cards as bag stuffers for a trade show I am doing on Friday Oct. 26.
Thanks for looking and onto the next post :D
God Bless you all.


Thanks for looking and onto the next post :D
God Bless you all.
Sunday, October 21, 2012
Avonlea Workshop
CTMH has several Workshops On The Go kits that you can buy. They include a Stamp set design just for the WOTG, paper packet and embellishments. All inks, markers and other extras you need to have separately.
This Workshop is the Avonlea one, its papers are also featured in the August SOTM projects. All the workshops except the Cricut ones, has enough paper to make 3 different projects. This workshop makes 2 double page LOs and a Photo box.
 Here is the Official art work. Now mine don't have pictures in them so you can at least see what it would look like once they are added.
 Page 1 Random stamped images, velvet rub-ons that are traced using the Chocolate marker. All edges of the paper are inked with Slate ink and the images are also stamped with it.
 Page 2 Done the same as page 1.
 Page 1 of the second double LO. Again all same techniques as the first set. What I have noticed is that each Workshop has a new technique to learn and add to your knowledge. Also its a great way for me to use papers and colours I would normally shy away from. I love colour and lots of it. Tend to find these boring but think they would be wonderful for old photos.

 Now this excited me, I love to alter things. I downloaded the template for this to cut all the pieces and proceeded to alter the box. Next time there are several things I would do. I would of either inked the edges or matched a paint to the paper and painted it first. As this was a first try, and I prefer to go with the instructions the first time around I did what was written down to do. Again random stamping image, which gives it a neat look. Plus I like the tracing of the rub-on helps it stand out more.
Alright on to the next projects :D
This Workshop is the Avonlea one, its papers are also featured in the August SOTM projects. All the workshops except the Cricut ones, has enough paper to make 3 different projects. This workshop makes 2 double page LOs and a Photo box.


Alright on to the next projects :D
Friday, October 19, 2012
August SOTM
Been so busy with CTMH and sb.com making stuff for Stamp of the Month, Workshops on the Go and Swaps.
All products used in these projects are from Close To My Heart unless otherwise stated.
I am going to start with my first SOTM from CTMH for Aug. Unfortunately I don't have the picture showing you the stamp set as I have a new computer and did not transfer over that image :( It was a series of corner and embellishments stamps. At first I was not very excited by it, but once I started using it and made 3 different projects with it I had changed my mind.
 First I started off with this card, sorry it is blurry. The paper package used is Avonlea. Its greys, blues and greens. Using one of the stamps from the set I used Slate ink to stamp the corners, the message is also stamped using Slate. I cut a slit in the grey card stock to fit the ribbon through. Then using Stickles Icicle I added some sparkle. Put some half pearls and called it done. Pretty quick card to make except for the little cut for the ribbon. The ribbon holds the card closed so it needs to be able to move.
 Next is was onto a single page LO. The yellow ribbon was from my stash and I folded it to make it appear ruffled. Surprising it was easy to do. Using one of the corner stamps from the set I proceeded to make my own patterned paper. I have never done that before and I really like the look. I believe the ink I used was Pacifica. Cut and layer several pieces of paper and that great grey satin ribbon for the bottom band. Added a bling swirl and fussy cut a couple of leaves for the flower. Turned out great.
 Last but not least, in fact it was my favourite item to make with this set. A display album. I use it to display the different Cards I have made for either SOTM or WOTG. Its very handy to have. Again I used a corner stamp and used the Slate colour to stamp in. Added my fake ruffled ribbon, different layers of paper to the circles. The scalloped circle and regular circle were both cut using the Cricut Artiste Collection only available through CTMH. Put on a couple of bling swirls, add a Prima flower in the middle to hid any flaws. Mod Pod to hold it all together.
I really like the fact there are several differt projects to do with each of the SOTM. It gives variety instead of the same old thing every time.
All products used in these projects are from Close To My Heart unless otherwise stated.
I am going to start with my first SOTM from CTMH for Aug. Unfortunately I don't have the picture showing you the stamp set as I have a new computer and did not transfer over that image :( It was a series of corner and embellishments stamps. At first I was not very excited by it, but once I started using it and made 3 different projects with it I had changed my mind.


I really like the fact there are several differt projects to do with each of the SOTM. It gives variety instead of the same old thing every time.
Saturday, August 25, 2012
MIA
Hello my crafting friends, Yes I know I left you for awhile but I am hoping you will forgive me once you see all the great things I have been making and working on to show you! As you know I signed up with Close To My Heart and was waiting on my start up kit. Well it came in and I already placed 2 orders and in the process of putting in my 3rd which will include my first customer order!!

CTMH now offers 2 different sign up kits, they have a Essentials kit for $49, which you see here. this includes Avonlea Scrap booking Kit Workshop on the Go plus the Bonus project and all you see here. The larger Master kit is $99, includes all you see here and 5 Studio J layouts, more supplies for Gatherings as well as some essential scrapbook supplies. I of course ordered the Master Kit.

CTMH had a promo for the month of August, when you sign up to be a consultant you get this bad for free. Now let me tell you I was impressed with this bag. Very heavy duty carry strap and you can also use it as a back pack. Well made and sturdy. I put all my customer supplies in it and there is still tons of room.
Now I loaned out all the cards I have been working so that a friend of mine could do the workshop I had this past Wednesday. Once they are back I will take pictures and make some blog post about them. I have also finished the Avonlea WotG and Bonus project so that needs to have pictures taken. But the one I am most excited about is the Halloween Party WotG that I have almost finished. It was so stinking cute in the catalogue I had to order it. Now I am doing a small trade show in October and I will be using it for a display. Hope I can get my name out there and find some customers and others to attend my gatherings. Here is crossing my fingers.
Thursday, August 9, 2012
Winter Wonderland
Sorry I have been gone so long. Went through a slump there when I was not selected to work with DCWV. Needed to motivate myself to create again. I could not even sit in my craft room. Well that went on long enough thank you and I had to get back to crafting. I joined an 12x12 LO swap on www.scrapbook.com so I had a goal. I have never done a LO swap before but I know I need to make more LOs, so I figured this would be a great way to get a ton of LOs back for an album. I have 2 spots to fill and this is the first one. For each spot I had to make a double page LO for 5 other ppl and also for me. So 6 of the same double page LOs. My first group is Winter and I titled the LO Winter Wonderland.
 Pg 1 - I started off with plain white pp for the back ground. Then selected the colour scheme I wanted to use. I love snowflakes so I also decided that they would figure largely in the LO design. I used CS from DCWV, the 3 stacks I used are the Metallic Stack, the Winter Wonder Stack(2010) and the Holiday Collection solids(2010). The blue pp is Recollections shimmer CS. Next I cut out the different elements needed to make the page. For this I use CTMH design book Imagine. I love using the design books or sketches because then I don't have to figure out The size of the cuts I need to make nor do I waste paper because they have it all laid out. Everything else about these pages is mine. All the CS is distressed with Starlite Silver ink by DewDrop. The words, snowflakes in a circle and the stamped snowflake in the right hand corner are cut using E2 CTMH exclusive Cart. Art Philosphy. The stamped snowflake is coordinating stamp set Snowflakes from CTMH Winter 2011 Catalog. Unfortantly my stamp pads are not in yet from CTMH so I used Stampin'Up Baja Breeze and then re stamped it with DewDrop Platinum Planet to add shimer. It is a double snowflake and the small punch out one is a Martha Stewart punch, not sure of the snowflake name. Then applied it to the page using a sparkle DoodleBug Brad. The silver snowflakes are attached with a snowflake brad, and the beaded fringe was from my stash. I can't remember which of my friends sent it to me otherwise I would mention her. The word Winter has 3 little dots cut out of each letter, I applied silver Stickles to these 3 dots.
 Pg 2 - More snowflakes cut out of the Art Philosphy Cart and matching stamps to stamp the images. It is not picking up well in the picture but the large snowflake also has glitter embossing on it. Using my iRock I added some bling to another snowflake. In the upper left hand corner of the page is the hidden journaling area. I again cut out an image with the E2 Art Philosphy Cart then using a Cuttle bug embossing folder I embossed the blue pp with snowflakes. Using a white sparkle snowflake brad I adhered it to the LO so that it would swing down to show the journal spot. The CS snowflake was from the Paper Studio.
 Here they are together, I think they look wonderful and now need to finish assembling all the others for the rest of the swap and plan my Spring one :)
I have plenty more to make and show you, I am just waiting on my CTMH consultant package to arrive. Once it is here I should be more active here as I need to make, post and share my love of crafting and CTMH products. Thank you for sticking with me and waiting around for me to come back. May God Bless you and hold you in the Palm of His Hand.


I have plenty more to make and show you, I am just waiting on my CTMH consultant package to arrive. Once it is here I should be more active here as I need to make, post and share my love of crafting and CTMH products. Thank you for sticking with me and waiting around for me to come back. May God Bless you and hold you in the Palm of His Hand.
Saturday, July 14, 2012
DCWV Design Team Submissions
Well it is Saturday and DCWV will be announcing their first ever Design Team tomorrow. As far as I am aware they have not even let the 12 ppl they have picked know yet. At least that is what I am hoping and praying for as I have not gotten an email either way. I am going to share with you today what I sent in to DCWV. Now they did not get all the pictures because I could only send 4 but you get to see everything.
![]() Of course everything is made with DCWV paper. This one I used Coral Couture, love the colours in this stack. The strips of glitter are difficult to see, wish I used a darker glitter. Also stitched the side were I joined the 2 CS pieces. The centre piece is cut with Spellbinders Labels Three, inked the edges then used a cupcake stamp. I coloured the image with H2O pigments(first time using them) and then added stickles for the candy. I like the look of the card just the glitter was wrong.
Of course everything is made with DCWV paper. This one I used Coral Couture, love the colours in this stack. The strips of glitter are difficult to see, wish I used a darker glitter. Also stitched the side were I joined the 2 CS pieces. The centre piece is cut with Spellbinders Labels Three, inked the edges then used a cupcake stamp. I coloured the image with H2O pigments(first time using them) and then added stickles for the candy. I like the look of the card just the glitter was wrong.
![]() I love this picture of my youngest Cara. Here I used The Sweet Stack. The title is My Little Chef done in Reflections glitter alpha Pink. I again used Spellbinders Grand Big Scalloped Ovals, some cooking buttons from my stash and Prima Flowers. The pink glitter paper is from DCWV Dazzle stack, I really like the fine texture of this paper and the great amount of sparkle to it, I plan on picking up more stacks like this one. I used Martha Stewart corner double loop bunch to add a little more detail plus I found it went well with the swirls on the paper. One of my favourite LOs I have done in a while.
I love this picture of my youngest Cara. Here I used The Sweet Stack. The title is My Little Chef done in Reflections glitter alpha Pink. I again used Spellbinders Grand Big Scalloped Ovals, some cooking buttons from my stash and Prima Flowers. The pink glitter paper is from DCWV Dazzle stack, I really like the fine texture of this paper and the great amount of sparkle to it, I plan on picking up more stacks like this one. I used Martha Stewart corner double loop bunch to add a little more detail plus I found it went well with the swirls on the paper. One of my favourite LOs I have done in a while.
![]() Next is a desk set. Journal, address box and a note card box. All using 4 Seasons stack. Of course I did them in purple as that is my favourite colour and I plan on having these on my desk.
Next is a desk set. Journal, address box and a note card box. All using 4 Seasons stack. Of course I did them in purple as that is my favourite colour and I plan on having these on my desk.
![]() This is my address box, It is made using a 12x12 sheet of card stock and inside are index cards with ppls addresses and birthdays on them. This way I hopefully won't forget any ones birthday. I have been involved and now run a birthday card exchange on http://www.scrapbook.com/ for the last 3 years now and this helps keep me organized. The top bling is from Reflections, Lace used around the top is from my stash, Purple flower from Micheal's $1 bins. Cross Stitched Diva star, kit is from Mill Hill beads but my talent stitched LOL. Love when I can combine both my cross stitch and paper crafting.
This is my address box, It is made using a 12x12 sheet of card stock and inside are index cards with ppls addresses and birthdays on them. This way I hopefully won't forget any ones birthday. I have been involved and now run a birthday card exchange on http://www.scrapbook.com/ for the last 3 years now and this helps keep me organized. The top bling is from Reflections, Lace used around the top is from my stash, Purple flower from Micheal's $1 bins. Cross Stitched Diva star, kit is from Mill Hill beads but my talent stitched LOL. Love when I can combine both my cross stitch and paper crafting.
![]() I am soooo LOVING altering Journals. I use fabric on the binding, from Walmart, then used matching lace from the address box for around the outside of the journal. Also were the CS joins the fabric I added lace and pearl trim from my stash. The purple flowers are all from http://www.iamroses.com/ , LOVE their mulberry flowers. Of course a matching purple bling flower in the corner. Using my crop-a-dile I put in two holes for the ribbon to tie it closed. Attached to the ribbon closer is a cameo that is done in silver and has purple rhinestones in it. The name plate is from Tim Holtz. I made this and it is what lead me to do a whole desk set. LOVE how it looks and all that PURPLE LOL.
I am soooo LOVING altering Journals. I use fabric on the binding, from Walmart, then used matching lace from the address box for around the outside of the journal. Also were the CS joins the fabric I added lace and pearl trim from my stash. The purple flowers are all from http://www.iamroses.com/ , LOVE their mulberry flowers. Of course a matching purple bling flower in the corner. Using my crop-a-dile I put in two holes for the ribbon to tie it closed. Attached to the ribbon closer is a cameo that is done in silver and has purple rhinestones in it. The name plate is from Tim Holtz. I made this and it is what lead me to do a whole desk set. LOVE how it looks and all that PURPLE LOL.
![]() This is my Note Box, it is an altered cigar box. As you can see I tied all the pieces together with the same CS, lace, trim and in some cases embellishments. I also added a butterfly from reflections with a pearl trail to the top. On the front I added a mesh flower from Prima and the glitter sticker boarder is from Reflections. I Mod Pod the boarder on because it would not lay straight. As you can see it still bubbled up a little. The only thing missing is legs for the box. Could not find any in time to take the pictures and send it off to DCWV.
This is my Note Box, it is an altered cigar box. As you can see I tied all the pieces together with the same CS, lace, trim and in some cases embellishments. I also added a butterfly from reflections with a pearl trail to the top. On the front I added a mesh flower from Prima and the glitter sticker boarder is from Reflections. I Mod Pod the boarder on because it would not lay straight. As you can see it still bubbled up a little. The only thing missing is legs for the box. Could not find any in time to take the pictures and send it off to DCWV.
![]() Here you can see the box open. Inside I lined it with paper, normally I would use fabric but I ran out of the purple. I made 12 Thank You cards to put into the box and found this cool flower pen at Michael's that fit the whole theme of this set. I hope this set had the WOW factor they were looking for. I Really Really would like to be on this team. DCWV is my first and only CS love. They come out with some amazing patterns, stacks and love how they add foil or glitter to their paper and it doesn't flake off. They CS is a nice heavy weight and perfect for all types of paper crafts. Well off to pace and find something to keep me busy today so I don't think about tomorrow LOL.
Here you can see the box open. Inside I lined it with paper, normally I would use fabric but I ran out of the purple. I made 12 Thank You cards to put into the box and found this cool flower pen at Michael's that fit the whole theme of this set. I hope this set had the WOW factor they were looking for. I Really Really would like to be on this team. DCWV is my first and only CS love. They come out with some amazing patterns, stacks and love how they add foil or glitter to their paper and it doesn't flake off. They CS is a nice heavy weight and perfect for all types of paper crafts. Well off to pace and find something to keep me busy today so I don't think about tomorrow LOL.
Next project I have is making 28 cards from 4 sheets of 12x12 paper. Saw it done on pintrest and going to try it myself. Plus I have to take pictures of the projects I made using my Big Shot and the E2 I recently purchased. I LOVE new tools :)
God Bless and have a wonderful day my crafty friends.


Next project I have is making 28 cards from 4 sheets of 12x12 paper. Saw it done on pintrest and going to try it myself. Plus I have to take pictures of the projects I made using my Big Shot and the E2 I recently purchased. I LOVE new tools :)
God Bless and have a wonderful day my crafty friends.
Wednesday, June 27, 2012
DT CALL
I missed posting 2 days ago and I am sorry. I am busy working on several designs/projects for DCWV first ever Design Team call. If you have been following me or have read some of my older posts you know I am a DCWV girl. I LOVE their paper, how thick it is, the foil or glitter elements they include, and the designs used. I am working very hard on this and making sure I use all my talent and knowledge so I can show case what I do. I am not holding back this time or second guessing myself. I am just going with it. Once I send these projects in and I hear back I will do a blog post on what I made until then I am keeping it under wraps. I hope to be back in 2 days with one of the other projects I am making just for fun.
Have a wonderful blessed day everyone and keep creating!
Have a wonderful blessed day everyone and keep creating!
Saturday, June 23, 2012
Workshops on the Go
CTMH comes out with a new catalog/idea book twice a year. In it are several new lines of paper and stamps. To save you money and get a nice assortment of the lines they have Workshops you can purchase. Sort of like Kit of the Month from some sites. Well I fell in love with the Lucy line so I ordered their Lucy Workshop. In it I got 12 sheets of CS some double sided, Lucy stamp set, Lucy glitter rub ons, Bitty Sparkles and an instruction brochure. What I did not realize until I sat down to make the 2 page LO was I would need to have the Exclusive Cricut Cartage Art Philosophy Collection. Lucky for me the consultant was willing to lend me hers.
 This is a perfect paper pack for little girls. I have 2 girls under the age of 5 so made 2 double page LOs from this package just changed the side that is showing to make them sightly different. With this kit I got to try a new technique, at least for me. All the die cuts were made with the Cricut except for the crowns those I fussy cut, UGH. Once all the pieces were cut it was time to stamp. The flowers and butterflies are all stamped. The flowers required 3 separate stamps and 3 separate colours. It was fun to line everything up just right so that it looked good.
 The Crowns are rub ons and then fussy cut out. I really dislike fussy cutting, I feel that is why I have a Cricut and my Grand Calibur so I don't have to do that anymore LOL.
 Here you can see the pendant that is on the page, this will hold a title at some point. Even though these pages have identical LOs they look slightly different due to the different colours and patterns used. You can just make out the fact I curled the petals on the flower. I also added rhinestones to the flower centers and the crowns. Princess Pages need some bling, :D
Have a great day everyone and don't forget to get outside and enjoy the sun and your family.


Have a great day everyone and don't forget to get outside and enjoy the sun and your family.

Thursday, June 21, 2012
May Stamp'in UP


Tuesday, June 19, 2012
June SOTM
I was not able to get to my Club this month but the consultant was kind enough to drop everything off for me to complete on my own. This is the cards and 1 of the LOs I used the XYRON with. This set was made with the Lucy Paper Pack and the June SOTM Life is Tweet.
 All of the pieces were already cut, the die cuts are from the Cricut CTMH Exclusive Cartridge Art Philosophy Collection. As you can see in the cards the stamps fit perfectly.
The first card has a primary layer of textured CS that was lightly sanded to show the white core. The next piece was inked on the edges and then the centre medallion is stamped saying "how tweet of you" with two little birds. A nice fast and quick card to make.
The second card has all the layered pieces edges inked and a couple of the corners punched with a corner rounder. The stamped image fit perfectly on the die cut and says "Life is tweet". I love layering cards and really need to do it more. The ribbon was put through the XYRON and stayed stuck in place LOL. Going to love that tool for ribbon.
 The LO has all edges inked again, and a stamp that fit perfectly on a die cut, which I pop doted up, added a bit of ribbon to finish it all off.
Still needs a title, pictures and some journaling. That will be a summer job, going through the TON of photos I have and getting them printed to start putting them on all my LOs.
Looking forward to Julys SOTM and the fact I will be a consultant for CTMH! I can't wait to sign up, get all my goodies and start sharing my talent, skills and learning more with others.

The first card has a primary layer of textured CS that was lightly sanded to show the white core. The next piece was inked on the edges and then the centre medallion is stamped saying "how tweet of you" with two little birds. A nice fast and quick card to make.
The second card has all the layered pieces edges inked and a couple of the corners punched with a corner rounder. The stamped image fit perfectly on the die cut and says "Life is tweet". I love layering cards and really need to do it more. The ribbon was put through the XYRON and stayed stuck in place LOL. Going to love that tool for ribbon.

Still needs a title, pictures and some journaling. That will be a summer job, going through the TON of photos I have and getting them printed to start putting them on all my LOs.
Sunday, June 17, 2012
CTMH SOTM Club
In April I started to attend a Close To My Heart Stamp Of The Month Club. We tend to make one Card and a 1 page LO. The stamps used of course are the set for that month. In this post I will share Aprils but not Mays, unfortunately I had a prior commitment and could not attend.
This is the LO, which for a new member was a nice simple choice to make. I will most likely add to it before I use it. Needs a title and more embellishments too.
 Sorry the card is sideways and that there is a bright flash on the corner. I uploaded this directly from my camera and can't edit it. This was a fun one to make. that back ground is a stamp that had to be lined up each time it was used. It took 4 times stamping the CS to get it to look like that. New technique for me, which is why I attend these workshops/clubs, is to learn. After I got home I added the stickles to the star and the brown pp. Every thing needs a little sparkle on it LOL.
Thanks for looking and following me. God Bless.

This is the LO, which for a new member was a nice simple choice to make. I will most likely add to it before I use it. Needs a title and more embellishments too.
Thanks for looking and following me. God Bless.
Friday, June 15, 2012
Xyron Create-a-Sticker

Well, I had a wonderful Pal at Easter time that sent me an incredible box of goodies for crafting. One of the things in the box was a Xyron 1.5" Create-a-Sticker in the shape of and colour of a Breast Cancer ribbon. Now this tool is one that I have looked at from time to time but have never been able to find any 3rd party info on. Then again I might not of been looking hard enough, LOL. It has sat on my desk since Easter until now.
First, I had a couple of cards to make and they had ribbon on them. For the longest time I have been trying different adhesive with ribbon to see how it sticks and how it lays. Until now my preference was Scor-tape in close to the same width as the ribbon I was using. Not a favourite way but better then most until tonight. I put my ribbon through the XYRON and presto adhesive on the back of my ribbon. Not only that but it was the right length too so no folding back extra adhesive. The hold was just right too. In the next post you will get to see the cards I made using the XYRON.
Next, I had this great Workshop I purchased from CTMH. Again I will tell you more about that LO Workshop in a different post. Here is what I used it for. I cut out some embellishments using the Cricut and fussy cut around some rubons. Here I have to say that I am not a fan of RubOns, nor of fussy cutting. Once I stamped a couple of images on the die cuts I then inserted them into the XYRON plus some strips of paper that I sanded. Made assembling the LO a whole lot easier.
The XYRON is a very easy tool to use and comes in quite handy. I am already planning on picking up some refill cartridges for it because it needs to be available every time I craft. This would be well worth the money to have on your desk, especially if you love to use ribbon in your crafting!
Thanks for reading and see you in a couple of days with a new post. May God hold you in the Palm of His Hand!
Subscribe to:
Posts (Atom)