Thursday, October 28, 2010
i-Rock
Can you say WOW....I went to the mailbox this morning and there was a package in it from a secret pal from Texas. I love to do swaps and this is a Secret Card Swap Pal that I do every month. Each month we are given a different name and survey of their wishes plus 2 cards that they would like in their package. So this month Rubys had my name(I only found this out when I opened the package), she sent me 4 rolls of ribbon fall and Halloween colours, a package of Mulberry flowers, a beaded bookmark some lace, two amazing homemade cards and the most important thing an i-ROCK tool. I am so excited to have this tool and cant wait to try it out. She also include some metallic rhinestones for it so that I can start creating right away. Ever since I saw this tool in youtube I knew I had to have it. The last time that happened was 3 years ago when I got my cricut and cuttle bug, love them!! Now all I have to do is go and buy some batteries and I am set to create. It takes 3 AA batteries so will pick them up tonight. I will then start making something I don't know what yet but have some swaps due so might work on those items and see how this works. I will post pics and my thoughts on this tool/toy tomorrow to let you all know if you HAVE to have one LOL.
Wednesday, October 27, 2010
incredible Prima giveaway
Ok I had to share this with you... I LOVE Prima embellishments and they are having an amazing give away. Will definitely be following this blog from now on. So check it out.
http://prima.typepad.com/prima/2010/10/prima-product-pick-october.html
http://prima.typepad.com/prima/2010/10/prima-product-pick-october.html
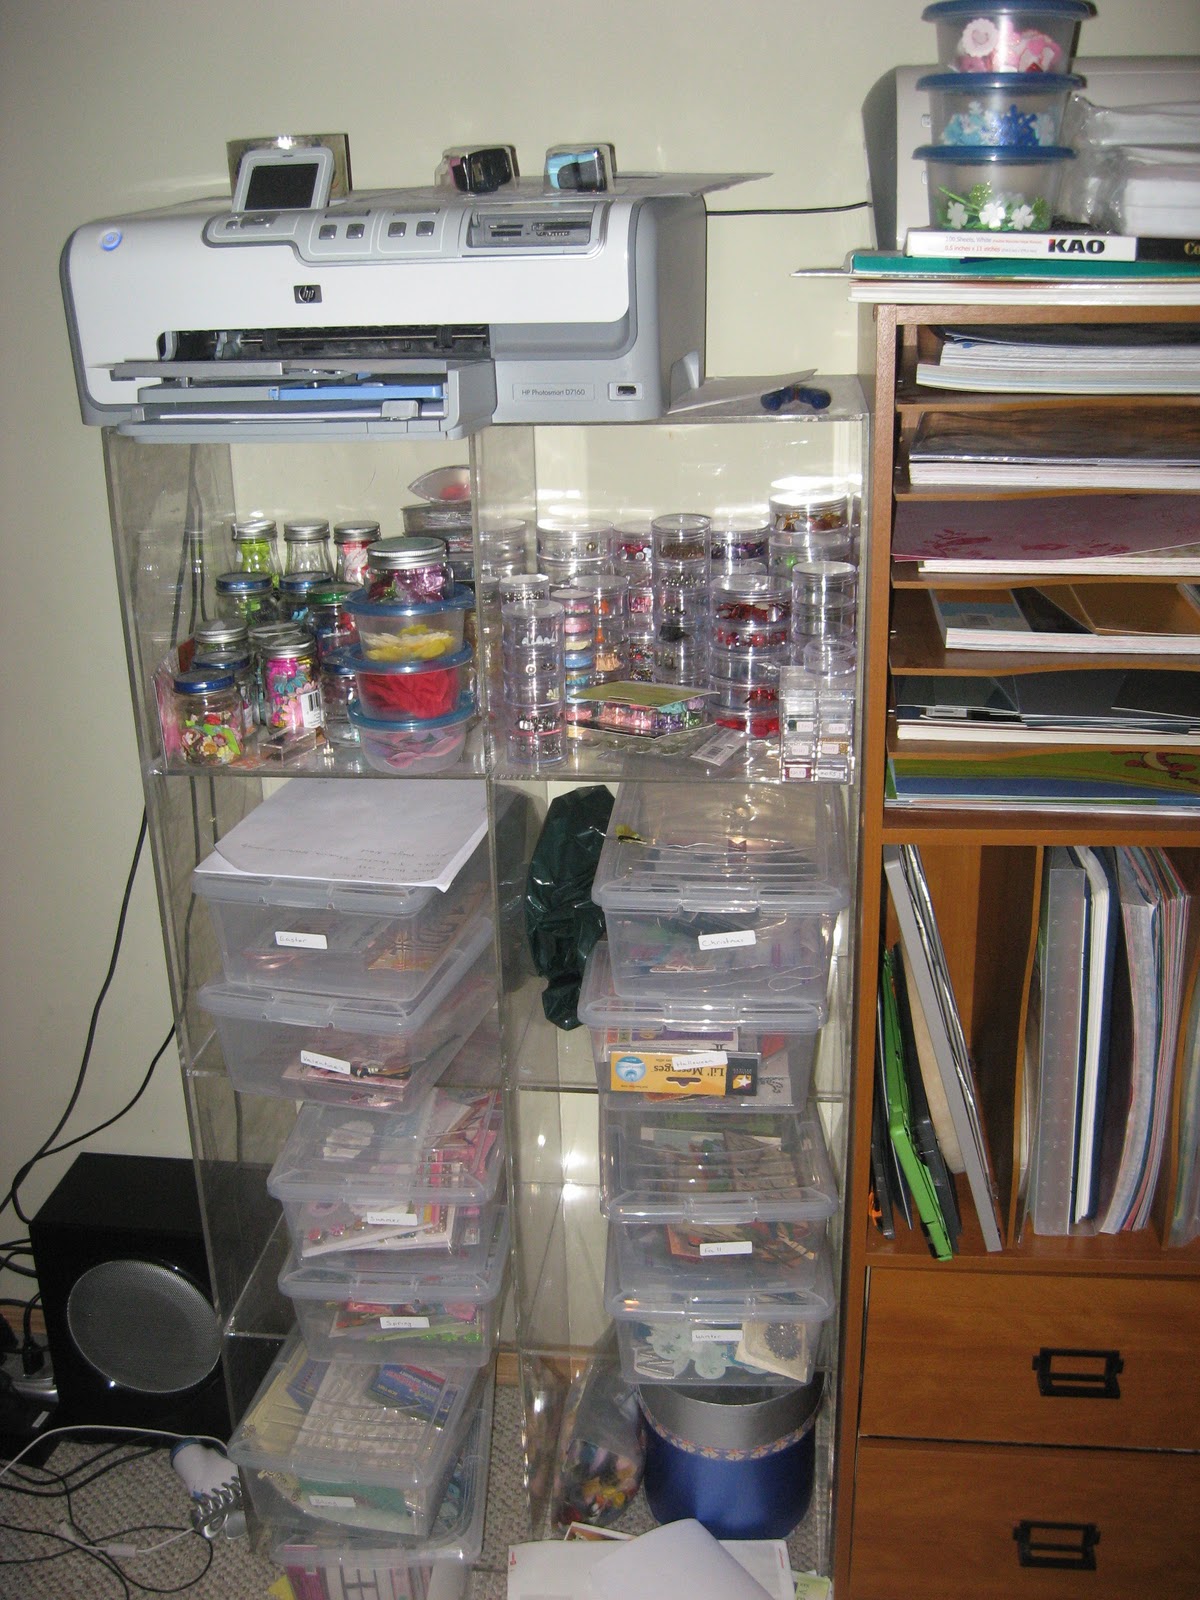
Current Scrap area
Currently I have an area in my master bedroom to store and do all my scrap booking. In the New Year I will be moving it all into a small bedroom/office once Cara is one and sharing a bedroom with her 2 year old sister. Here are a couple of pictures of how it looks right now. When I redo my room I will post new pictures.
 This is much fuller now then when the picture was original taken. Top shelves hold nothing but DCWV cs stacks lol I am addicted to them. The bottom drawers hold clear stamps and tools, in the middle are my chalks, stamp pads, the other drawers hold cards and card making supplies.
 These containers are organized by category, I have added more containers organized by colour.
 This is an old shoe organizer from a store. It holds my embellishments sorted by colour and type.
 My computer center. Holds alot of projects that friends have made for me. It helps to inspire me to be more creative.
 This unit holds all my cross stitching supplies.
 This is my desk and design area. A little messy but that is how I work. I need everything out and around me.


Tuesday, October 26, 2010
Cross stitch pins


This little cat witch is holding a pumpkin and has a bat charm on her hat. 1 day to complete.
This cute little bat is wearing a purple vest and holding a gold star charm. 1 day to complete.


Paper Bag Album Finally


This is my first attempt at a paper bag album. I won the Rak for this on Martica's blog. In the Rak was everything needed to make and complete this album. I added a few embellishments and CS of my own. The over all colours provided were black, red and cream. I think most of the CS is from DCWV Le Creme Stack. I love black glitter pp she included would loved to have more. The flowers were from the Rak I added Diamond stickles to the petals, the ribbon is velvet with a silver heart slider, and a white butterfly plus the black lace all from the Rak. I added the red bling flourish from my own stash. I chose to boarder every page in xmas red stickles to tie all the pages together with on element that was the same through out. I love this cover I made never thought I could take so many different elements and come up with such an elegant design.
This page has two different pp used and then a red sparkly ribbon down the seam were I joined the two papers. The flap folds so that you can see the whole other page. This was a little difficult to do but not sure how else I could of decorated it.


On this page I again made a pocket except going diagonal. The striped cs, red cs and rhinestones were from my own stash. I used the last of the lace to boarder the top of the tag, the butterfly added stickles to the voids in the wings. I love all the ribbon I used here. I would have to say this is one of my all time favourite pages

This is the back of my album. The only thing here from my stash is the red cs. Again I added stickles to the rose petals. The black shear ribbon has sparkles on it. I enjoyed stretching my talent making this album and I would never have tried one if I had not won Martica's blog Rak. A huge thank you goes out to her for all the inspiration she provides me and for the chance with this and with swaps she has hostess for me to use and try things I would never of thought of myself. I will definitely be trying to make one of these again and hopefully with more creativity then I used here. It was a great stepping stone and learning experience.
WOW nice blog candy
I will try again latter to post pictures having some issues with the loader on this site right now. Until then check out this blog and the wonderful chance to win some Copic markers.
http://thestampingboutiquechallengeblog.blogspot.com/2010/10/blog-candy-worth-25000-including-36.html
http://thestampingboutiquechallengeblog.blogspot.com/2010/10/blog-candy-worth-25000-including-36.html
Wednesday, October 20, 2010
An other Gypsy give away.
I dont know about you but I want one of these tools. It would be the coolest addition to my crafting and would help me to get to a whole new level of creativity. Check out the link and enter to win!!
http://lisafalduto.blogspot.com/2010/10/another-gypsy-giveaway.html
http://lisafalduto.blogspot.com/2010/10/another-gypsy-giveaway.html
DCWV Giveaway
Well you know how I am about DCWV so I just had to share this chance for you to win some great new product from them. Check it out.
http://dcwvinc.blogspot.com/2010/10/say-what-giveaway-today.html
I will be posting more of my creations later today and this week. It has been a very busy week here so have not had much time to upload my pics. Thanks for following.
http://dcwvinc.blogspot.com/2010/10/say-what-giveaway-today.html
I will be posting more of my creations later today and this week. It has been a very busy week here so have not had much time to upload my pics. Thanks for following.
Monday, October 18, 2010
Gyspy Giveaway
If you want to win a gyspy then check out Pinky's blog. She does some amazing work and she is on the DT for the Cricut Magazine. In honor of that they have given her another Gyspy to give away! Here is the link.
http://blueyecicle.blogspot.com/2010/10/want-to-win-cricut-gypsy-gypsy-giveaway.html
http://blueyecicle.blogspot.com/2010/10/want-to-win-cricut-gypsy-gypsy-giveaway.html
Wednesday, October 13, 2010
Recycle can


Saturday, October 9, 2010
Tin Challenge


Subscribe to:
Posts (Atom)